Autopilot
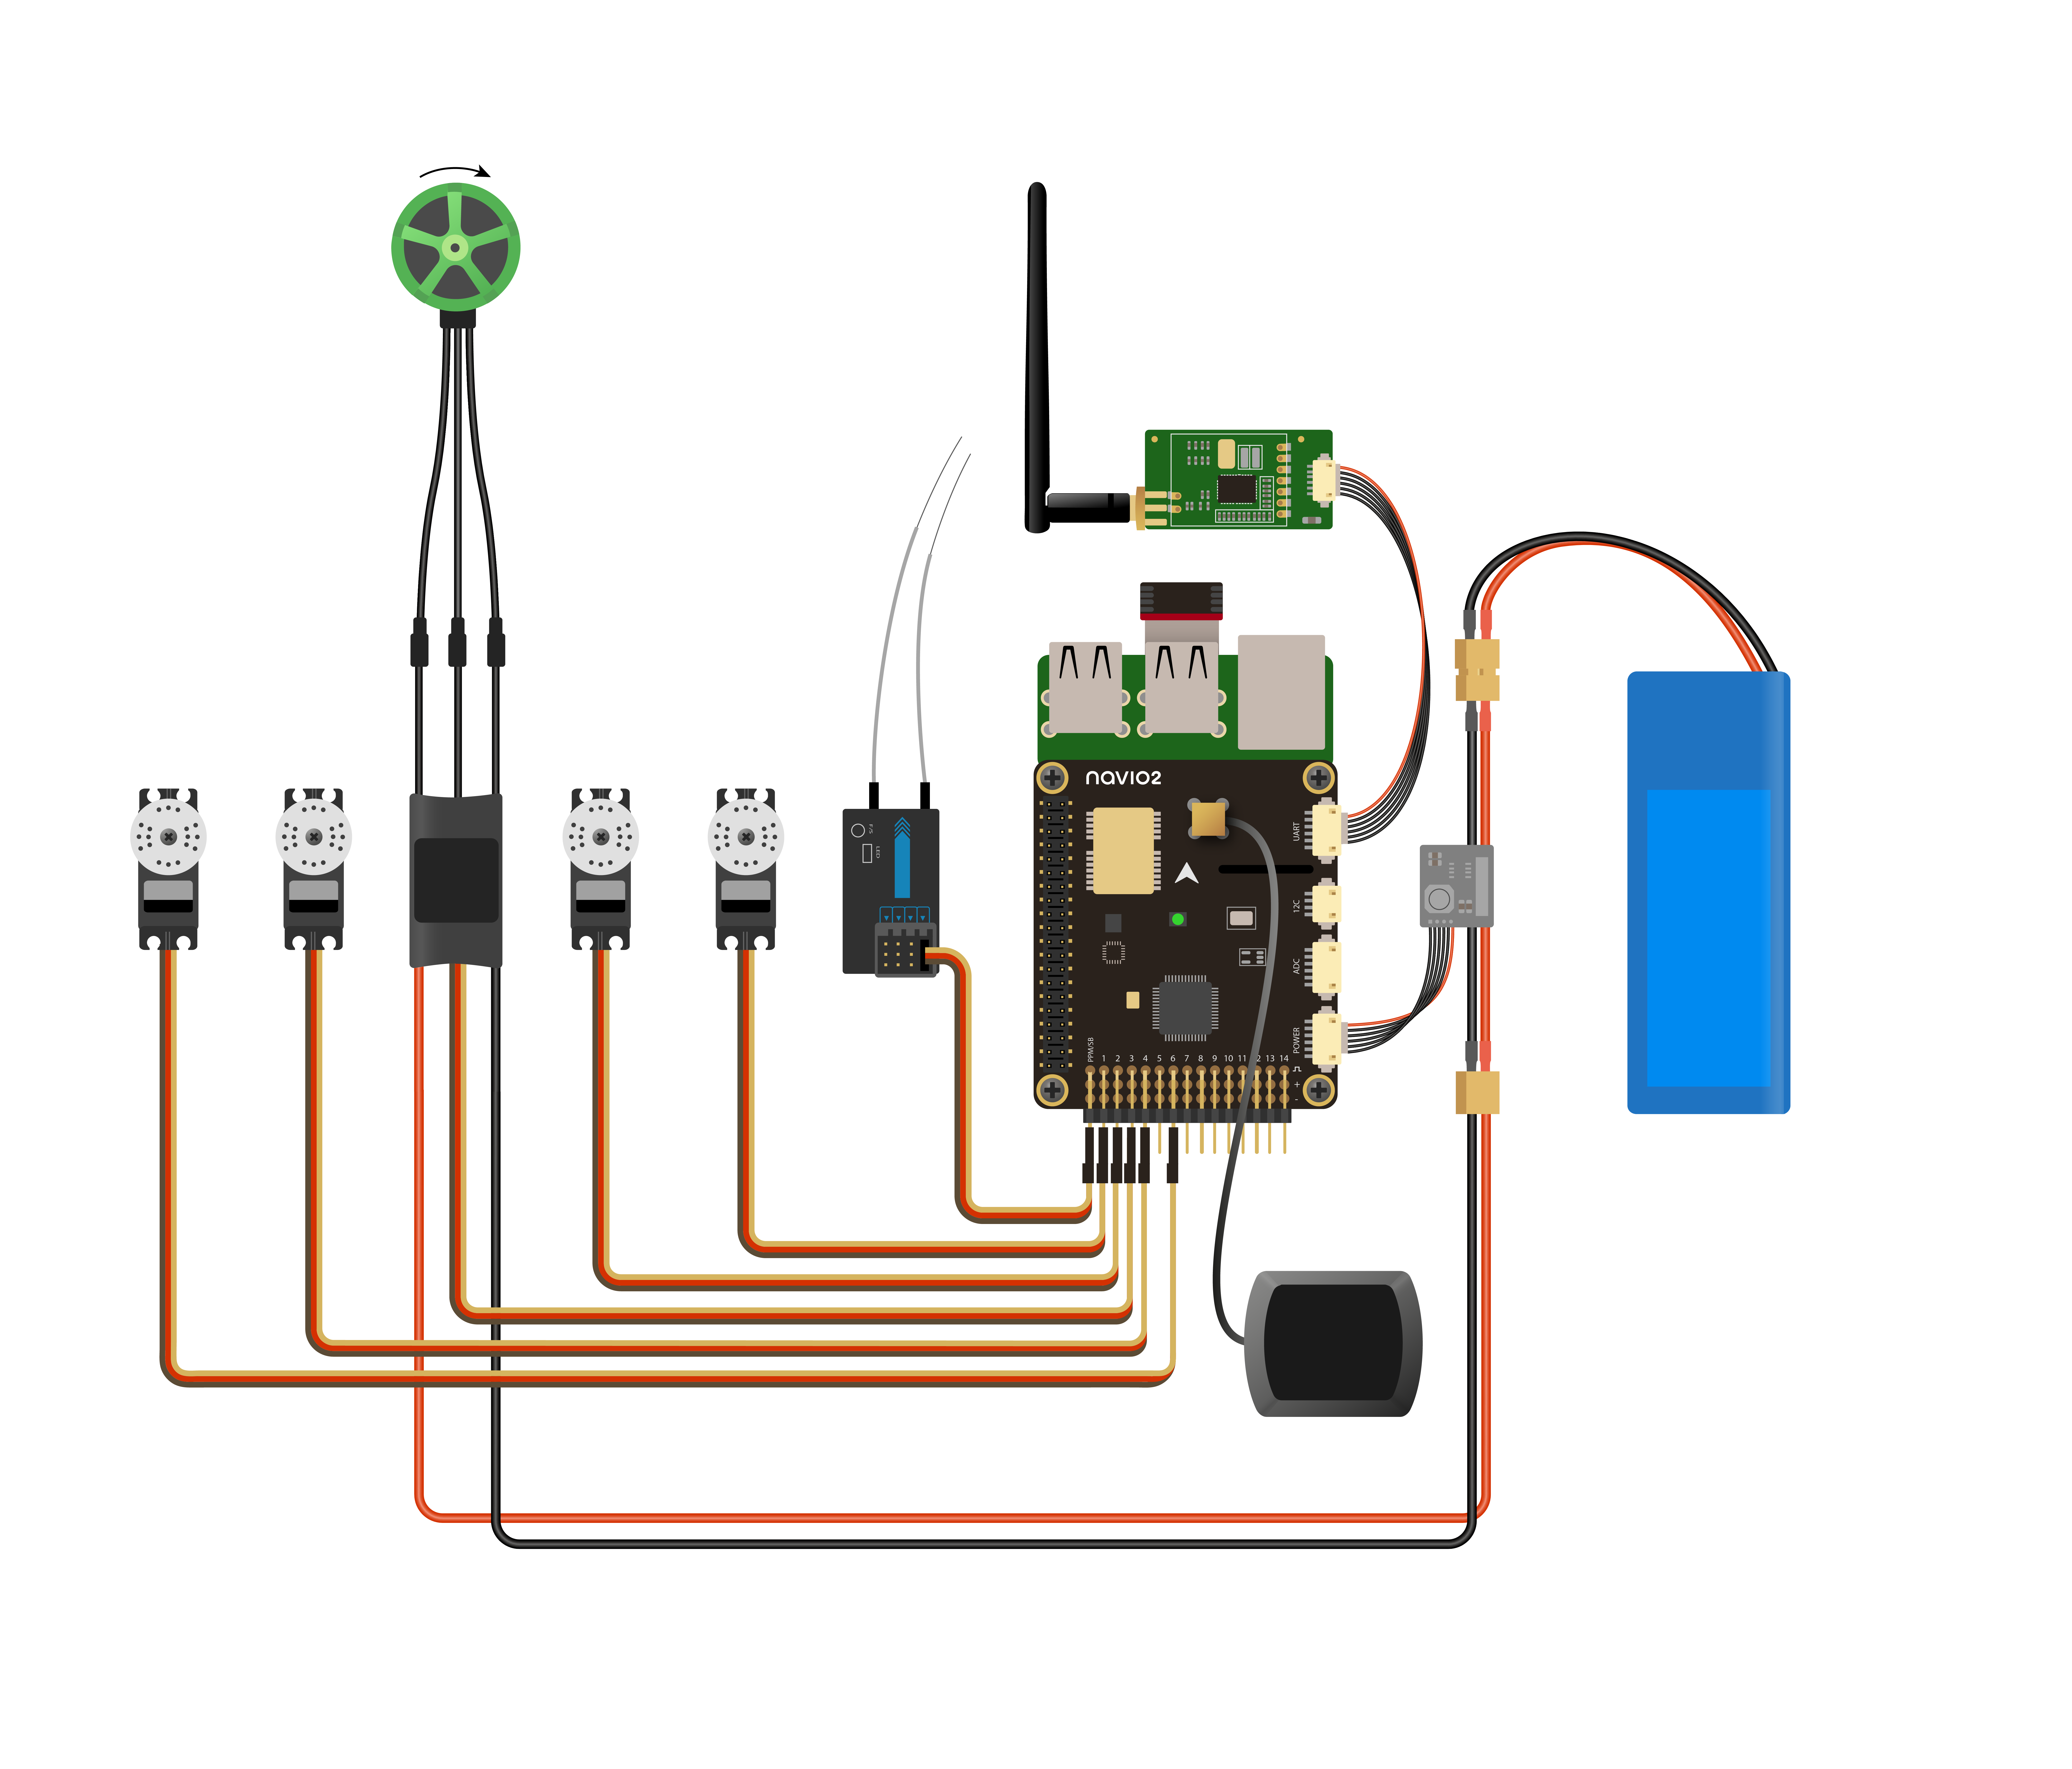
The core of the technical hardware is a Raspberry Pi with a Navio2 shield. I have used the installation instructions from the manufacturer (Emlid) to connect the receiver, the servos and the motor. The power supply is provided by Emlid. All in all the following components were installed:
Control system:
- Navio2
- Raspberry Pi
- 9g Servos (5x)
- Motor: Tunrigy 1400KV
- ESC: 45a
- GPS antenna (Navio2)
- Power module (Navio2)
- Telemetry
- 2200mAh Turnigy Lipo
- Receiver Turnigy 9x
- channel to SBUS adapter
FPV: (optional)
- FPV camera
- 25mw 5.8gHz transmitter
Hardware#
Navio2 and Raspberry Pis#
Emlid provides detailed instructions, for cabling and installation of the Navio2.
I downloaded the latest debian based image for the raspberry pi and used the Raspberry Pi Imager write the image to a SD card.
This image consists of already preinstalled packages and tools. Among others Ardupilot and ROS.
After I modified the wpa_suplicant.conf as described in the manual, so that the rpi automatically connects to the wifi,
I used ssh to connect to the rpi. Emlid added an empty ssh file in the image for this.
With
I configured ardupilot for my setup and enabled the telemetry. Since the Rpi is connected to the wifi and telemetry is not yet set up, I choose UDP for telemetry, by adding the local IP of my computer as described in the instructions.
Up to this point neither servos, motor or receiver were connected.
Wiring#
Here I followed entirely the illustration provided by Emlid. The arrangement of the servos can also be swapped, because later you have to set the outputs manually anyway.

The tragedy with the telemetry#
After I was done with the setup of the Rpi and wired the rest of the hardware (correctly), I downloaded Mission Planner. The connection via UDP established itself directly, but was of course dependent on the wifi and therefore a temporary solution. I used the wiring described by Emlid to connect the Navio2 with the telemetry. After connecting the counterparty to my computer, I tried to establish a connection.
However, I kept getting the error message No Hearbeat packages recieved.
The telemetry was wired correctly according to the instructions of Emlid.
It was also enabled by adding /dev/ttyAMA0 as telemetry target in the configuration file.
The red lights, which are supposed to signal the transmission of data, did not blink either, so I looked for the error in the Navio and not in the telemetry itself.
Plugging the telemetry into a USB port of the Rpi and selecting this port for data transfer solved the problem.
Before I solved the problem, I spent almost a whole day looking for the error. Why ? I suspect that the UART port of my Navio is defective. Since I couldn't just accept that, I of course spent ages looking for the error on my end and (unfortunately) dived deep into the semantics and syntax of serial protocols. But on the way I made a big mistake: I enabled the serial port from the RPI.
caution
Never enable the serial port of the PI when the Navio2 board is installed.
This leads to undefined behavior.I think that the communication between the Rpi and navio2 is broken and the image of Emlid, already uses the serial pins. Sometimes the PI doesn't start anymore and also doesn't connect to the wifi. However, sometimes everything works as expected.
I solved this by using the second setup via USB and disabling the serial port.
FPV#
Here I reused my old setup from a fpv quad. The live video transmission is not really necessary, because 25mW will probably not be enough to guarantee a continuous connection to the aircraft when it follows waypoints (Of course always in line of sight). Eventually I will upgrade to the FPV combo vo DJI with its huge range with HD transmission. But as long as I can not guarantee that the Duck flies safely I prefer not to risk losing the precious hardware.
Remote Control#
After everything was wired and the Navio2 was successfully set up, the remote control had to be configured correctly.
However, if you follow emlid's instructions, in my case the servos were already configured correctly.
Since I used an additional servo for the landig gear, I had to define another output based on the YAW channel.
Sensors#
Ardupilot uses multiple external and internal sensors. There is a GNSS antenna included with the navio2 for navigation.
There is also an onboard compass and a current sensor we need to configure.
When configuring the compass, the aircraft must be slewed. You can find instructions here.
The Volt and Current sensor must also be configured. The instructions can be found here.
The Accelerometer can be configured equivalent to the Compass.
Flight modes#
There are several flight modes that have different characteristics.
However, since my control skills are quite limited and I do not want to rely on them, I have selected the following three modes: STABILIZE, FBWA and Guided.
| Mode | Roll | Pitch | Throttle | GPS | Need TX | Summary |
|---|---|---|---|---|---|---|
| ... | ||||||
| STABILIZE | + | + | - | Y | Wing-leveling on stick release | |
| FBWA | s | s | - | Y | Wing-leveling on stick release | |
| GUIDED | A | A | A | Y | Wing-leveling on stick release | |
| ... |
| Symbol | Definition |
|---|---|
| - | Full manual control of flight surfaces |
| + | Manual control with stabilized limits or assistance |
| s | Stabilized control with limits |
| A | Automatic control |
I was not sure if the STABILIZE was enough for me or if I should use FBWA, but descided to try the STABILIZE mode.
However, the test flight showed that I should rather have chosen MANUAL.